
Feature Libraries#
General Information#
Overview#
Feature libraries are part of the custom library infrastructure that is provided by the QC Module. This infrastructure allows customizing standard measurement tasks of the QC software easily by including custom functionality using a common interface without actually modifying the source code of the tasks. Therefore, compatibility with future software updates can be ensured much easier compared to customized measurement tasks.
Specific features are implemented in individual feature libraries that can be linked into standard task scripts easily. A selection of features is provided with the normal QC software, special features may be implemented on customer request by KLIPPEL.
This document refers to a variety of available standard features provided by Klippel.
Working with Feature Libs#
This section gives an overview of the working principle and handling of feature libraries on application level.
Principle#
Most available test steps (tasks) delivered with the QC software provide a dedicated interface for customization via the custom library. This library acts as a link between the main task script and additional functionality provided by one or more dedicated feature libraries. The custom library includes any available feature and acts as a hub for the custom code provided by those libraries.
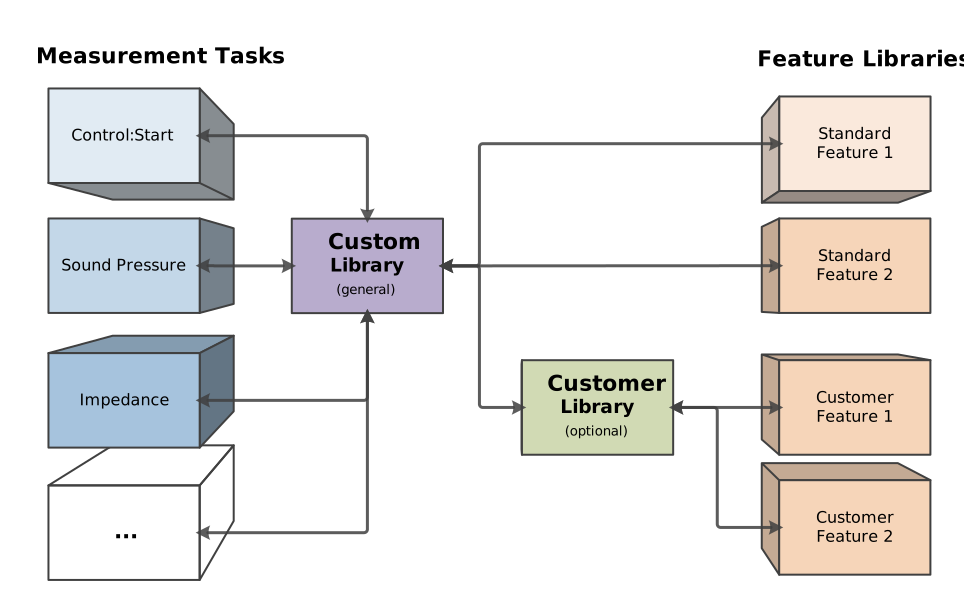
Feature libraries can be separated in two groups according to their origin. General purpose feature libraries are provided by Klippel, they are installed with the QC software and maybe activated any time. Additionally, there may be customer specific feature libraries which may be implemented on request. Those features are installed separately but integrate seamlessly with the standard features. Usually there are no restrictions in combining different features.
Enabling & Disabling Features#
Features may be added or removed from the software configuration using the Feature Library Selector tool which is available during QC installation (QC Install Guide) or accessible via or .
The dialog lists all available and active feature libraries as shown below.
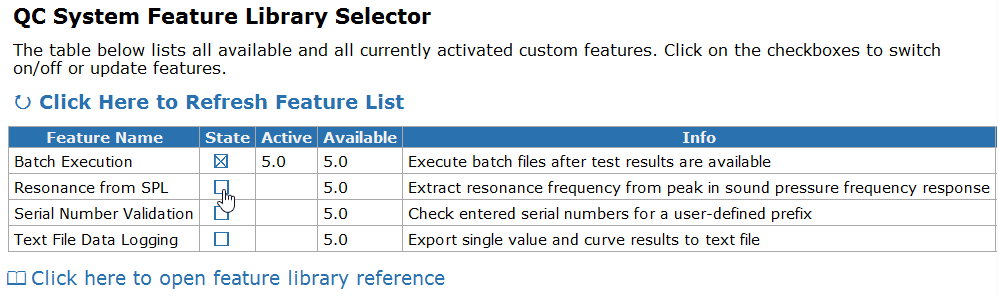
Features may be activated or deactivated using the checkboxes. Also, customer specific features will be listed, if available.
Note
Customer specific features which are not part of the standard QC software delivery must be installed first before they are available to the Feature Library Selector. Usually a dedicated setup file is provided by KLIPPEL.
Task Interface#
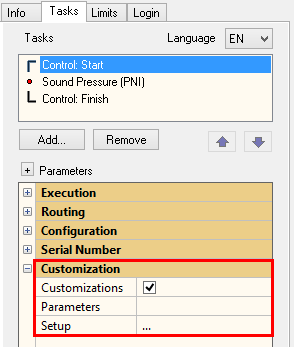
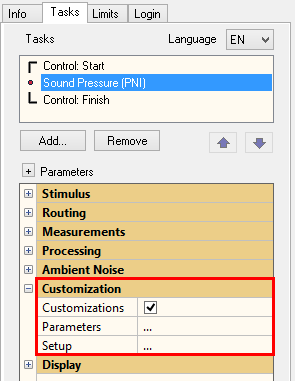
In case any feature is activated according to section Enabling & Disabling Features, further parameters will be available in the test property page for each task. The screenshots below show the custom parameters in the property page of the control and a measurement task.
Activation#
The custom library may be activated individually in each task by activating the checkbox Customizations.
In special cases, features shall be activated always without explicit enabling the Customization option on the property pages or the user must not have the ability to activate or deactivate features. In those cases, please contact Klippel support for further information. Since this option may cause unpredictable effects, it is not available in general.
Properties#
Most custom features require further configuration. For this reason, two shared properties are available in category Customization. They are defined as universal string matrix which may be filled with an arbitrary number of custom parameters according to the example below:
clibParam = [
' Parameter1 = 12345; '
' Parameter2 = ''string content''; '
' Parameter3 = [1 2; 3 4]; '];
The feature libraries automatically extract relevant entries and check their validity (syntax, content). Please refer to Feature Libraries Reference for information on available library/feature specific custom parameters.
Note
Unknown entries will be ignored as different features may be used independently in parallel. Therefore, make sure that the parameter names correspond to the specification of the feature library.
Most settings are defined in property Parameters, which may be modified without restrictions. Setup in contrast is dedicated for feature settings which may affect result data and thus invalidate limit or reference DUT consistency.
Note
The global setting Reference DUT Integrity defines whether property Setup invalidates reference DUTs or not.
Feature Libraries Reference#
This section provides information and operating guidelines for all general-purpose standard features which are provided with your QC installation.
Batch Execution#
Applicable to Task#
Control Task (Control:Start/Control:Finish)
Requirements#
Not licensed, free of charge
Feature Description#
This feature library is dedicated to executing external custom batch files at the end of a test when all test results and the overall verdict is available.
Relevant test and auxiliary information is provided as environmental variables (character strings) as shown in the table below. This allows conditional batch execution or usage of test specific information and file paths.
- Cfg_DatabasePath
full path of currently used database (database in current test folder)
- Cfg_DutStartTime
Start time infromation of teat run
Format: see SciLab function
getdate()documentation- Cfg_LimitCalcMode
true if limit calculation mode is activated on property page Limits
- Cfg_LimitCalibMode
true if calibration of limits has been started
- Cfg_LimitsAvail
true if all limits of all tasks required to run the operation are calculated. It is also true, if no limit is required.
- Cfg_LoginMode
login mode, possible values are:
“OPERATOR”
“ENGINEER”
“PROGRAMMER”
- Cfg_MonitorID
Name of IOMonitor entered at Hardware Dialog. For details see separate documentation on IOMonitor.
- Cfg_PCName
Provides Windows name of computer
- Cfg_SerialNumber
serial number of current DUT
- Cfg_Speaker
currently used speaker channel
- Cfg_UserName
Current user name
- Ctrl_ErrorGeneral
Global error message If non-empty the measurement will be blocked and the error message is shown in the Summary window.
- Ctrl_OverallVerdict
Code for overall verdict: - -1: Void, no result - 0: Fail, nok - 1: Pass, ok - 2: Warning - 3: Noise - 4: Invalid
- Ctrl_Repeat
True, if the test (all tasks) is going to be repeated
- Ctrl_SaveData
Carries the full file name for data logging (.kdbx file).
- Ctrl_LogFolder
Absolute path to the folder used for data logging
- Cfg_ExecutionMode
Session-wide execution mode. This variable is mainly dedicated to external synchronization modes (see SYN – External Synchronization).
- Results_Pass
String with all passed test results, tab (
ascii(9)) separated- Results_Fail
String with all failed test results, tab (
ascii(9)) separated- Results_Warning
String with all warning test results, tab (
ascii(9)) separated- Results_Void
String with all void test results, tab (
ascii(9)) separated- Results_Noise
String with all noise test results, tab (
ascii(9)) separated- Results_Invalid
String with all invalid test results, tab (
ascii(9)) separated- Meas_Trigger
Measurement trigger. Possible values are:
“start”
“repeat”
Note
The same functionality is provided by the I/O & Prompt task which may be included at any position in the task sequence. However, only in the Control:Finish task all parameters , the final overall result and the result strings will be available.
Properties#
ExecBatAfterTest#
This string parameter specifies the path and filename of the batch file to be executed. The validity of the path is checked automatically.
Available in Task#
Control:Start
Available in Property#
Parameters
Format#
clibParam = ' ExecBatAfterTest = ''<file path>''; '
ExecBatSilent#
optional
This optional Boolean parameter specifies whether the target batch file is executed silently in the
background (%T - default) or a command window is displayed during execution (%F)
Available in Task#
Control:Start
Available in Property#
Parameters
Format#
clibParam =[
:
' ExecBatSilent = %T/%F; '];
Note
If user interaction (keyboard input) is required during batch execution this parameter
should be set %F. Otherwise the QC will not return from execution (as long as ExecBatWait is %T)
ExecBatWait#
optional
If this optional Boolean parameter is true (%T - default) the QC will wait until the batch execution
is terminated.
Available in Task#
Control:Start
Available in Property#
Parameters
Format#
libParam =[
:
' ExecBatWait = %T/%F; '];
ExecBatAfterLog#
optional
If this optional Boolean parameter is true (%T - default) the QC will delay the call of the batch
file until the database log file has been written to the hard disk.
This option may be used to access data from the logged database by automation access. See Automation Documentation Package for an example.
Available in Task#
Control:Start
Available in Property#
Parameters
Format#
clibParam =[
:
' ExecBatAfterLog = %T/%F; '];
Data Logging to Text File#
Applicable to#
- The following measurement tasks support data logging:
Documented Version: 7.20
Requirements#
Not licensed, free of charge
Remarks#
This feature library replaces former Curve Logging feature. All legacy parameters are still supported for compatibility.
Feature Description#
This feature library is an add-on to the standard data logging output of the QC System. Single value and curve data may be exported to plain text files for direct import into third party (e.g. spreadsheet) software. Apart from full result logging (Klippel .kdbx file) and the Summary log file (*.log) selected measures and corresponding limits may be exported to tab separated value ASCII files.
Principle#
A Klippel QC Test consists of multiple tasks that are executed in a defined sequence:
Control: Start
Measurement Task 1
…
Measurement Task n
Control: Finish
The Control:Start task prepares the curve logging feature while the measurement tasks perform the output of all available or requested results to individual .txt files.
Finally the Control:Finish task terminates the curve logging and stores the results in a specified folder in conjunction with the standard Data Logging settings.
Export Data Format#
Curve Data#
Each curve is stored in an individual multi-column, tabulator separated ASCII files. The file name is a combination of test task title, task subtitle (if defined) and measure ID (according to standard summary log file).
The first line contains the column headers:
frqFrequency<curveName>measure IDmaxUpper limit (if available)minLower limit (if available)
Values that are not available are represented by Nan (not a number).
- Example
Frequency response curve (Sound Pressure (SPL) task) with upper limit only, the limit is not defined at all frequencies.
frq resp max
10.5 100.2 Nan
20.8 103.5 105.7
30.9 110.7 Nan
Single Value Data#
In contrast to curve data, all single value data of one measurement task is exported to a single text file. The file name is a combination of task title and task subtitle (if available).
The first line contains the column headers:
name- Measure namevalue- measure ID (according to .log file)max- Upper limit (if available)min- Lower limit (if available)
Example
Name  Value       Max     Min
re    3.5451      3.9117  3.2005
le    0.00023686
cmes  0.00041911
Naming#
All single value results are stored in one single text file per measurement task:
<taskName>-[<taskSubtitle>]-values.txt
- Examples
Sound Pressure-resp.txtFrequency response, Sound Pressure task does not have a subtitle.
Sound Pressure-left channel-resp.txtFrequency response, Sound Pressure task has the subtitle “left channel”
Impedance-woofer-values.txtTS parameters of Impedance task with the subtitle “woofers”
Note
The subtitle entered by the user in Klippel QC might contain characters that are not
allowed for file names under windows (\/:*?”<>|). These characters are replaced by an underscore (_).
Properties#
TxtLogTargetDir#
(previously CurveLogTargetDir)
Available in Task#
Control:Start
Description#
This string parameter specifies the (relative or absolute) target folder that is used to store the curve log files. If this parameter is not specified the curve logging feature will be deactivated. If the path specified here is not absolute, it is applied relative to the standard log folder of the current test (according to settings in Control:Finish).
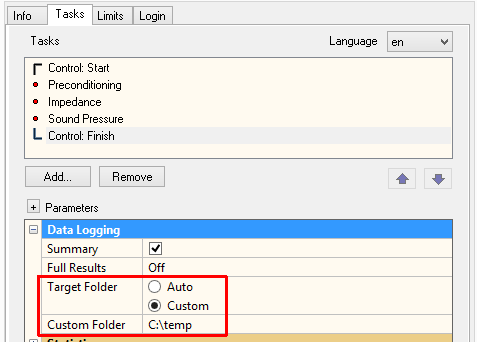
If the option Data Logging: Full Results is set to Separated by verdict, the logged data are stored in an additional subfolder specifying the verdict, such as Pass, Fail etc.
Replacement tokens may be used to generate dynamic folder names including the date and time, the serial number or the complete log database name (see details below). Otherwise, if a static folder name is specified, old results are overwritten at the end of every test. In this case the data is always consistent to the last test performed.
Available in Property#
Parameters
Format#
' TxtLogTargetDir = ''<file path>''; '
- Available replacement tokens:
<dateTime>date and time of the measurement start<SN>serial number of the DUT (empty, if serial number handling not active!)<logDbName>full name of corresponding .kdbx log database file<overallVerdict>overall test verdict (such as pass, fail, noise, invalid, warning, void)
- Example
clibParam = ' TxtLogTargetDir = ''curves\<logDbName>'' '
- Resulting log path for an example DUT:
D:\QC Data\My Test\log\curves\DUT abc123 2012-04-12 15-35-01-0 UTC+0200
TxtLogMetaInfoFile#
Available in Task#
Control:Start
Description#
This string parameter specifies the file name that is used to store the metadata log file. If this parameter is not specified the metadata information is not saved.
Replacement tokens may be used to generate dynamic folder names including the date and time, the serial number or the complete log database name. Otherwise, if a static folder name is specified, old results are overwritten at the end of every test. In this case the data is always consistent to the last test performed.
Available in Property#
Parameters
Format#
' TxtLogMetaInfoFile = ''<file path>''; '
- Available replacement tokens:
<dateTime>date and time of the measurement start<SN>serial number of the DUT (empty, if serial number handling not active!)<logDbName>full name of corresponding .kdbx log database file<overallVerdict>overall test verdict (such as pass, fail, noise, invalid, warning, void)
- Example
clibParam = ' TxtLogMetaInfoFile = ''<logDbName>_Meta.txt'' '
Resulting file name for an example DUT:
DUT abc123 2012-04-12 15-35-01-0 UTC+0200_Meta.txt
Available Metadata#
Here the available metadata information is listed.
Cfg_DatabasePathFull path of currently used database
Cfg_DutStartTimeDate & time of test start
Cfg_LimitCalcModeTrue if Limit Calculation Mode is activated on property page Limits
Cfg_LimitCalcModeTrue if recalibration of limits has been started
Cfg_LimitsAvailTrue if all limits of all tasks required to run the operation are calculated.
Cfg_LoginModeLogin mode, possible values are
OPERATOR,ENGINEERandPROGRAMMERCfg_MonitorIDName of IOMonitor (legacy) entered at Hardware Dialog
Cfg_PCNameProvides Windows name of computer
Cfg_SerialNumberSerial number of current DUT
Cfg_SpeakerCurrently used speaker channel
Cfg_UserNameCurrent user name
Ctrl_ErrorGeneralGlobal error message. If non-empty the measurement will be blocked and the error message is shown in the Summary window.
Ctrl_OverallVerdictCode for overall verdict: -
-1: Void, no result -0: Fail, nok -1: Pass, ok -2: Warning -3: Noise -4: InvalidCtrl_RepeatTrue if the test (all tasks) is repeated
Ctrl_SaveDataFull file name for data logging (.kdbx file)
Ctrl_LogFolderAbsolute path to the folder used for data logging
Cfg_ExecutionModeSession-wide execution mode. This variable is mainly dedicated to External Eynchronization modes.
Results_PassCharacter string with all passed test results
Results_FailCharacter string with all failed test results
Results_WarningCharacter string with all warning test results
Results_VoidCharacter string with all void test results
Results_NoiseCharacter string with all noise test results
Results_InvalidCharacter string with all invalid test results
TxtLogCurveFileName#
Available in Task#
measurement tasks with curve results
Description#
This string parameter specifies the file name that is used to store the curve log files. If this parameter is not specified the file name is defined by default as
<taskName>[-<taskSubtitle>]-<curveName>.txt
The name tokens are defined as follows:
<taskName>English name of task (e.g. “Sound Pressure”)<taskSubtitle>This optional label will be added if a subtitle was added to the task manually. If this parameter in enclosed in[ ]together with any other string, the complete string within brackets is omitted, if no task sub-title is defined for the measurement task.<curveName>name ID the curve measure (according to .log file). Using this naming convention, the curves can easily be correlated to the verdicts stored in the Klippel QC Standard log file.<dateTime>date and time of the measurement start, it is identical to the time stored in the logged summary file or database.<SN>serial number of the DUT (empty, if serial number handling not active or not enforced). If this parameter in enclosed in[ ]together with any other string, the complete string within brackets is omitted, if no serial number is defined for the current test.<testName>name of currently used .kdbx test database file (without extension .kdbx)
Replacement tokens should be used to generate curve-specific and / or dynamic file names including
the date and time, the serial number or the complete log database name. Otherwise, if a file with
the specified file name already exists, an increasing number is appended (example: myExport(1).txt).
Available in Property#
Parameters
Format#
' TxtLogCurveFileName=''<file path>''; '
For available replacement tokens see description in previous section.
- Example
clibParam =
'TxtLogCurveFileName=“\ *<taskName>[-<taskSubtitle>]-<curveName>[_<SN>]_<dateTime>.txt*\ ”'
Resulting file name for an example DUT:
Type13_woofer_resp_0001324_2012-04-12 15-35-01-0 UTC+0200.txt
TxtLogValueFileName#
Available in Task#
measurement tasks with single value results
Description#
This string parameter specifies the file name that is used to store the single value log files. If this parameter is not specified the file name is defined by default as
<taskName>[-<taskSubtitle>]-values.txt
The name tokens are defined as follows:
<taskName>English name of task (e.g. “Sound Pressure”)<taskSubtitle>This optional label will be added if a subtitle was added to the task manually. If this parameter in enclosed in[ ]together with any other string, the complete string within brackets is omitted, if no task sub-title is defined for the measurement task.<dateTime>date and time of the measurement start, it is identical to the time stored in the logged summary file or database.<SN>serial number of the DUT (empty, if serial number handling not active or not enforced). If this parameter in enclosed in[ ]together with any other string, the complete string within brackets is omitted, if no serial number is defined for the current test.<testName>name of currently used .kdbx test database file (without extension .kdbx)
Replacement tokens should be used to generate test-specific and / or dynamic file names including
the date and time, the serial number or the complete log database name. Otherwise, if a file with
the specified file name already exists, an increasing number is appended, for example:
myValueExport (1).txt.
Available in Property#
Parameters
Format#
' TxtLogValueFileName=''<file path>''; '
For available replacement tokens see description above.
- Example
clibParam =
'TxtLogValueFileName=“Values\_\ *<taskName>[-<taskSubtitle]>[_<SN>]_<dateTime>.txt*\ ”'
Resulting file name for an example DUT:
Values_Type13_woofer_0001324_2012-04-12 15-35-01-0 UTC+0200.txt
TxtLogCurveList#
(optional, previously CurveLogFileList)
Available in Task#
measurement tasks with curve results
Description#
This optional parameter specifies the curves (incl. limits) to be exported for every individual measurement task. If the parameter is not used, all available curves are exported.
Setting the parameter
TxtLogCurveList = []will activate all available values in the task automatically.Setting the parameter to empty string
TxtLogCurveList = ''''will deactivate curve logging for this task. Note the double quotes in this case (string identifier within a string requires double quotes).
Available in Property#
Parameters
Format#
' TxtLogCurveList = ''<curve1>,<curve2>,…'' '
The requested curves are specified in a comma-separated list. The curve name IDs are case sensitive and correspond to the standard .log file of the QC Software. The most common IDs are listed below. Invalid curve IDs will trigger a parameter error. All available (in task) curves may be specified but only actually measured curves will be logged (not empty).
- Example:
Custom Parameter of Sound Pressure (SPL) Task
clibParam =[
:
' TxtLogCurveList = ''resp,rbz,rthd'' '];
Only Frequency Response, Rub&Buzz and relative THD will be logged
Available Curve IDs#
Here the most common curve and corresponding labels are listed. Note the case sensitive IDs!
Sound Pressure Task#
Parameter |
ID |
|---|---|
Frequency Response |
|
Frequency Response (normalized) |
|
Rub+Buzz |
|
Rub+Buzz (relative) |
|
IDD |
|
IDD (relative) |
|
Band Levels |
|
Phase |
|
Polarity |
|
THD (absolute) |
|
THD (relative) |
|
2nd…5th Harmonic |
|
HI-2 |
|
DC-X |
|
Peak Displacement |
|
Bottom Displacement |
|
3DL - Excitation Projection |
|
3DL - Spectral Projection |
|
Mean Disturbance to Mask Ratio |
|
Sharpness Ratio |
|
Roughness Ratio |
|
Note
Most IDs are also valid for Sound Pressure + Impedance task
Impedance Task#
Parameter |
|
|---|---|
Impedance |
|
Impedance Phase |
|
Impedance points |
|
Voltage |
|
Voltage N+D |
|
Current N+D |
|
Voltage Phase |
|
Displacement |
|
Note
Most IDs are also valid for Sound Pressure + Impedance task
Motor + Suspension Check (MSC) Task#
Parameter |
ID |
|---|---|
Impedance |
|
Balanced Armature Check (BAC) Task#
Parameter |
ID |
|---|---|
Impedance |
|
Linear Suspension Test (LST) Task#
Parameter |
ID |
|---|---|
Magnitude |
|
Fitted Magnitude |
|
Spectrum Analysis (SAN) Task#
Parameter |
ID |
|---|---|
Frequency Response |
|
Spectrum |
|
Incoherence |
|
Polarity |
|
Multi-Tone Distortion (MTD) Task#
Parameter |
ID |
|---|---|
Multi-Tone Spectrum |
|
Multi-Tone Distortion |
|
Noise Floor |
|
Post Processing (PP) Task#
Parameter |
ID |
|---|---|
Difference |
|
TxtLogValueList#
(optional)
Available in Task#
measurement tasks with single value results
Description#
This optional parameter specifies the single value results (incl. limits) to be exported for every individual measurement task. If the parameter is not specified, all available values are exported.
Setting the parameter
TxtLogValueList = []will activate all available values in the task automatically.Setting the parameter to
TxtLogValueList = '' ''will deactivate curve logging for this task. Note the double quotes in this case (string identifier within a string requires double quotes).
Available in Property#
Parameters
Format#
' TxtLogValueList = ''<value1>,<value2>,…'' '
The requested curves are specified in a comma-separated list. The value name IDs are case sensitive and correspond to the standard .log file of the QC System. The most common IDs are listed below. Invalid IDs will trigger a parameter error. All available values may be specified but only actually measured curves will be logged (not empty).
- Example:
Custom Parameter of Sound Pressure (SPL) Task
clibParam =[
:
' TxtLogValueList = ''fs,re,qts'' '];
only Resonance Frequency, Re and Qts will be logged
Available Value IDs#
Here, the most common single value results and corresponding IDs are listed. Note the case-sensitive IDs!
Sound Pressure Task#
Parameter |
ID |
|---|---|
Average Level |
|
Note
The parameters are also valid Sound Pressure + Impedance task
Air Leak Detection Task#
Parameter |
ID |
|---|---|
MODabs |
|
MODrel |
|
DETabs |
|
DETrel |
|
: |
: |
Note
The parameters are also valid Sound Pressure task with ALD license
Impedance Task#
Parameter |
ID |
|---|---|
Re |
|
Le |
|
Qts |
|
Qms |
|
Qes |
|
fs |
|
Bl |
|
Cmes |
|
Lces |
|
Res |
|
Mms |
|
Kms |
|
Cms |
|
Rms |
|
Vas |
|
fb |
|
Qb |
|
Motor + Suspension Check Task#
Parameter |
ID |
|---|---|
xOffset |
|
AKms |
|
xBl |
|
xC |
|
Re |
|
fs |
|
Qts |
|
fb |
|
Qb |
|
Balanced Armature Check (BAC) Task#
Parameter |
ID |
|---|---|
xOffset |
|
Re |
|
fs |
|
Qts |
|
Le |
|
Linear Suspension Test (LST) Task#
Parameter |
ID |
|---|---|
Resonance Freq. fr |
|
Q-factor |
|
Stiffness k0 |
|
compliance c0 |
|
Federzahl |
|
Nom. Res. Freq. fn |
|
Mass deviation |
|
Stiffness deviation |
|
Spectrum Analysis (SAN) Task#
Parameter |
ID |
|---|---|
Level |
|
Post Processing (PP) Task#
Parameter |
ID |
|---|---|
Max. Deviation |
|
IO & Prompt (IO) Task#
Parameter |
ID |
|---|---|
Temperature |
|
Humidity |
|
TxtLogHideHeader#
(optional)
Available in Task#
measurement tasks with curve results
Description#
This optional parameter may suppress the header within the log file(s). Both, curve data and single value output files are affected. By default, a header is written into log file as:
frq <curveName> max min
followed by the actual curve data.
Available in Property#
Parameters
Format#
' TxtLogHideHeader= %T / %F'
TxtLogPrecision#
(optional)
Available in Task#
measurement tasks
Description#
This optional parameter defines the precision (significant digits) of the exported curves and single values data. If the parameter is not specified, the default precision 5 is used.
Available in Property#
Parameters
Format#
'TxtLogPrecision = <precision>'
- Example:
Custom Parameter of Sound Pressure (SPL) Task
clibParam =[
:
' TxtLogPrecision = 5; '];
all exportes curve (incl. frequencies) and single value results will be rounded to 5 significant digits (e.g. 123.45)
Working with the Feature#
The behavior of the text file data logging is closely related to the standard data logging of the QC. Thus the settings in parameter group Data Logging of the Control:Finish task also apply here.
This includes settings like
for DUTs (log mode) - only passed/failed units may be logged or respectively logging in separated folders
Custom folder - the custom folder specified here will be the base path for the curve logging
If data are exported, a link is inserted in the Summary chart to quickly navigate to the export folder.
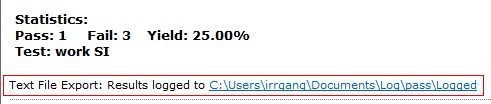
According to the standard behavior, curve logging will be deactivated if no limits are available.
Resonance from SPL#
Applicable to#
Available from QC 4
Requirements#
Not licensed, free of charge
Feature Description#
This feature library is intended to be used for piezo-electric transducer or other measurements of resonator like behavior. It is also applicable for tracking resonances or tonal components in other scenarios.
Additional verdicts are introduced for
SPL level of frequency response (or spectrum) maximum
Frequency (resonance) of frequency response (or spectrum) maximum
The frequency range of search for the resonance maximum can be defined by user.
Properties#
Default properties are automatically added to the customized parameter at Login if this feature library is installed and if the Customization is enabled in the host task.
SPLRes_Enable#
Description#
This bool parameter enables the feature. It is disabled by default.
Available in Property#
Parameters (can be modified without effect on Reference DUTs)
Format#
clibParam = ' SPLRes_Enable = %F;';
SPLRes_fmin, SPLRes_fmax#
Description#
These are numeric parameters that define the bandwidth in which the max SPL is searched for.
Default values:#
SPLRes_fmin = 0;
SPLRes_fmax = Cfg_SampleFreq;
Available in Property#
Parameters (can be modified without effect on Reference DUTs)
Format#
clibParam = 'SPLRes_fmin = 8000';
clibParam = 'SPLRes_fmax = 20000';
SPLRes_Lim_min, SPLRes_Lim_max#
Description#
These are numeric parameters that define the limits for target max SPL value.
Single sided limits are supported. Unused limits shall be undefined or set to empty matrix ([]).
Default values:#
SPLRes_Lim_min = [];
SPLRes_Lim_max = [];
Available in Property#
Parameters (can be modified without effect on Reference DUTs)
Format#
clibParam = ' SPLRes_Lim_min = 80';
clibParam = ' SPLRes_Lim_max = 85';
SPLRes_fLim_min, SPLRes_fLim_max#
Description#
These are numeric parameters define the limits for target resonance frequency range.
Single sided limits are supported. Unused limits shall be undefined or set to empty matrix ([]).
Default values:#
SPLRes_fLim_min = [];
SPLRes_fLim_max = [];
Available in Property#
Parameters (can be modified without effect on Reference DUTs)
Format#
clibParam = ' SPLRes_fLim_min = 1550';
clibParam = ' SPLRes_fLim_min = 1850’;
Working with the Feature#
The feature is an add-on for QC software version 4.1 or higher, it must be installed before use using the Feature Library Selector (in QC5). See section Enabling & Disabling Features.
Enable the feature on Customization property on task property page:
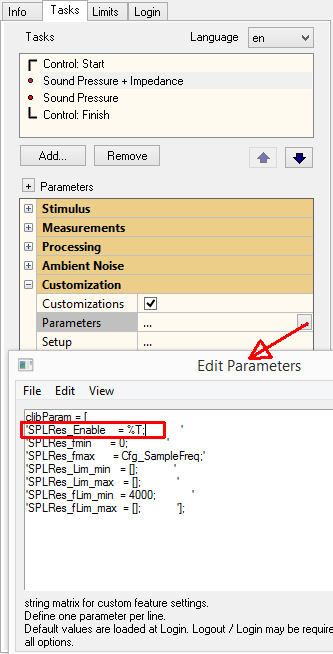
If limits are defined (also single sided limits are supported), two new verdicts are added:
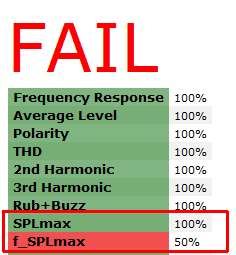
If no limits are defined or if they are empty ([]), the verdict is VOID.
It is not possible to select either SPLmax or f_SPLmax.
The results are stored in the Summary.log text file for use in post-processing tools (Yield Statistics, Excel, Minitab…).
Numeric results are displayed in a separate table:
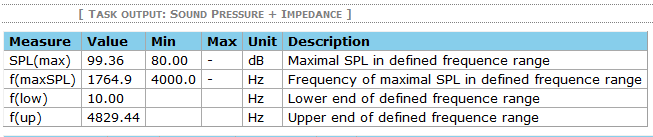
There is no graphical representation in chart Frequency Response.
Special Comments for Spectrum Analysis Task#
Since the Spectrum Analysis (SAN) task provides both Frequency Response and Spectrum, only one of the two result curves can be taken into account. In case Frequency Response measurement is activated, this feature applies to the corresponding curve. If Spectrum measurement is activated and Frequency Response is deactivated, the resonance will be tracked in the spectrum, instead. This is useful for tracking tonal components in noise and vibration testing.
Validation of Serial Numbers#
Applicable to#
All test sequences that incorporate the standard Control task.
Requirements#
Not licensed, free of charge
Feature Description#
This feature library checks the entered serial number, compares it to a prefix and a length defined by the user. If the prefix does not match the beginning of the serial number or its length is different to the defined length, the measurement is blocked.
Furthermore, it prompts the user for a new serial number:
If a mismatched serial number is entered again, the test will be finished (logout) and the correct test setup can be selected in QC-Start
If a matching serial number is entered, a new test is started
The start can be terminated (cancelled).
This feature supports sole bar code scanner operation. No keyboard or mouse action is required but possible.
Properties#
validateSN_Prefix#
Available in Task#
Control:Start
Description#
This string parameter specifies the required prefix for any serial number used in this test. The following restrictions apply:
If
validateSN_Prefixis empty string (validateSN_Prefix = '' ''), prefix validation is not applied.validateSN_Prefixmay contain numbers, characters, and special characters except any quotes (single or double quote)The validation is NOT case sensitive.
If
validateSN_Prefixis not defined in the Custom Parameters list, it is initialized with the test name at Login time. This initialization requires enabled Custom Parameters.The test name is defined in QC-Start when creating the test. This is the default behavior when creating a new test from a template. If a user defined template shall be used, the user must clear the variable
validateSN_Prefixfrom the Custom Parameters list to enable the automatic initialization.
Available in Property#
Parameters (can be modified without effect on Reference DUTs)
Format#
clibParam = ' validateSN_Prefix = ''my_prefix''; ';
Note
The prefix must be enclosed with two single quotes ('' ... '').
validateSN_Length#
Available in Task#
Control:Start
Description#
This integer parameter specifies the length of any serial number used in this test. The following restrictions apply:
If
validateSN_Lengthis empty (validateSN_Length = []), length validation is not applied.validateSN_Lengthis a positive integer.If
validateSN_Prefixis not empty, its length must be shorter thanvalidateSN_Length.If
validateSN_Lengthis not defined in the Custom Parameters list, it is initialized empty.
Available in Property#
Parameters (can be modified without effect on Reference DUTs)
Format#
clibParam = ' validateSN_Length = my_length; ';
where my_length is a positive integer.
validateSN_Enable#
optional
Available in Task#
Control:Start
Description#
This optional Boolean parameter activates/deactivates (%T /%F) the serial number validation feature
Available in Property#
Parameters
Format#
clibParam =[' validateSN_Enable = %T/%F; '];
Working with the Feature#
Installation and Setup#
The validation requires the following settings to be operable:
The feature ValidateSN is an add-on for QC software version 4.1 or higher.
The feature ValidateSN must be installed before use. It can be installed / deinstalled using the Feature Library Selector from QC5)
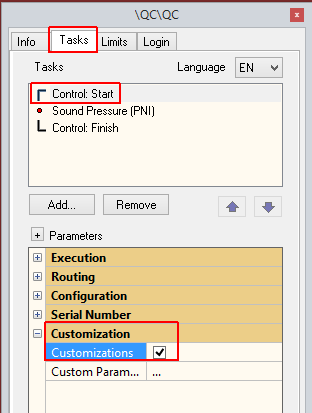
The Customizations checkbox in section Customization for Control: Start task must be enabled:
Note
If there is no
validateSN_Prefixspecified yet, it will be initialized with the test name on the following login after enabling the Customizations checkbox. It is recommended to logout / login to force the initialization.The variables
validateSN_PrefixandvalidateSN_Lengthmust be defined in property Customization - Parameters. An initialized prefix may be manually modified. Please check: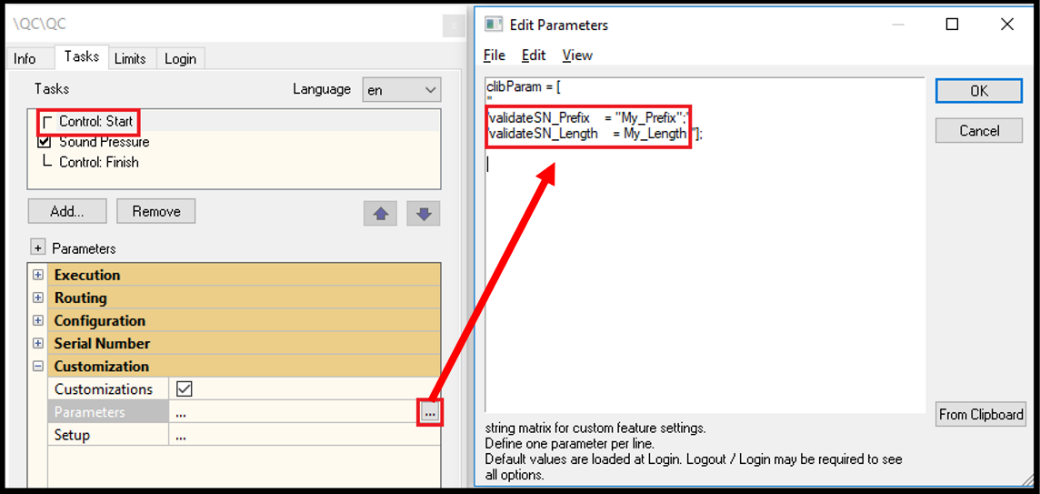
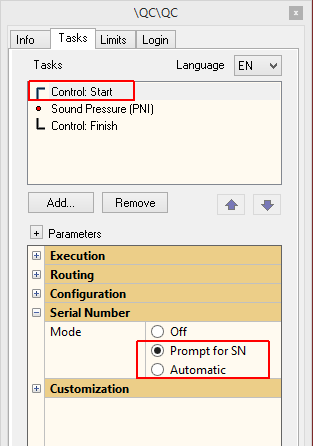
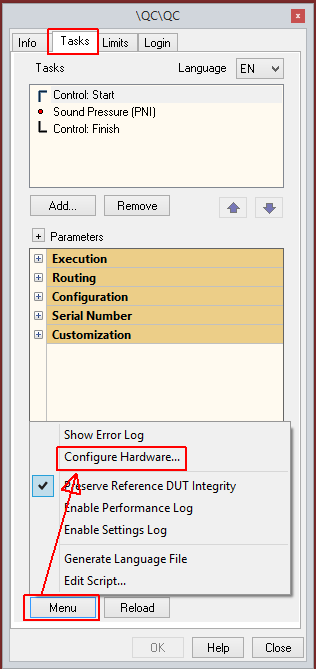
Any serial number mode must be enabled in Control Task:
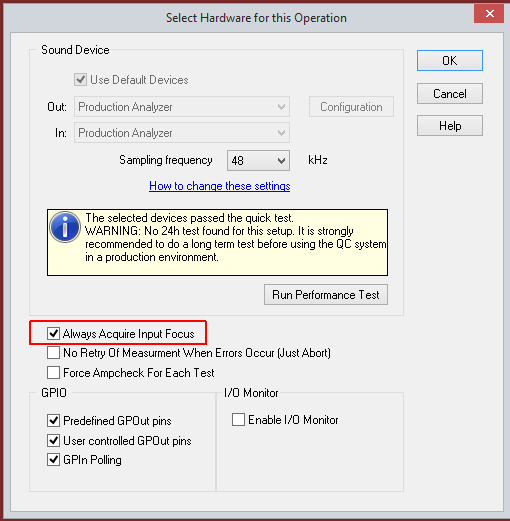
For barcode operation the option Always Acquire Input Focus must be enabled:
Using This Feature#
The validation is done at the start of any test. The start can be triggered by serial number input using keyboard or barcode scanner or using the Start button / Repeat button. In case the defined serial number prefix and length match the actual used serial number (Note: check is not case sensitive), the test is executed as intended. There is no confirmation of the passed validation.
In case of a mismatch a dialog appears:
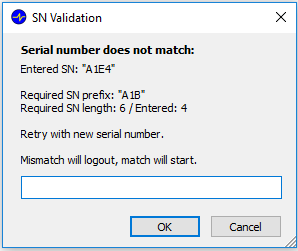
Enter a new serial number and confirm with OK.
If it does not match again, the test will terminate and return to QC-Start. The correct test for the entered serial number can be selected and started (also with sole bar code, if required).
If it does match the prefix and length now, a new test with updated serial number will start.
Cancel will block the started test and prompt for a new serial number.
Dynamic DC Displacement Check & Control#
Applicable to#
Status#
The Feature Library is deprecated since QC 6.2 version. It is now an add-on module for the SPL Task. The setup is not converted to the add-on automatically. In case of problems, please contact support.
Square Wave Test Stimulus#
Applicable to#
all tasks using sine sweep (chirp) stimulus (SPL, IMP, SPL+IMP)
Available from QC 5.0d
Requirements#
Not licensed, free of charge
Feature Description#
This feature library supports square wave stimulus for special test requirements e.g., in automotive industry. Typical applications are testing buzzers, ultrasonic sensors or simple alarming devices which are operated by a square wave in the final application.
Instead of the standard sine sweep, a rectangular wave pattern is used:
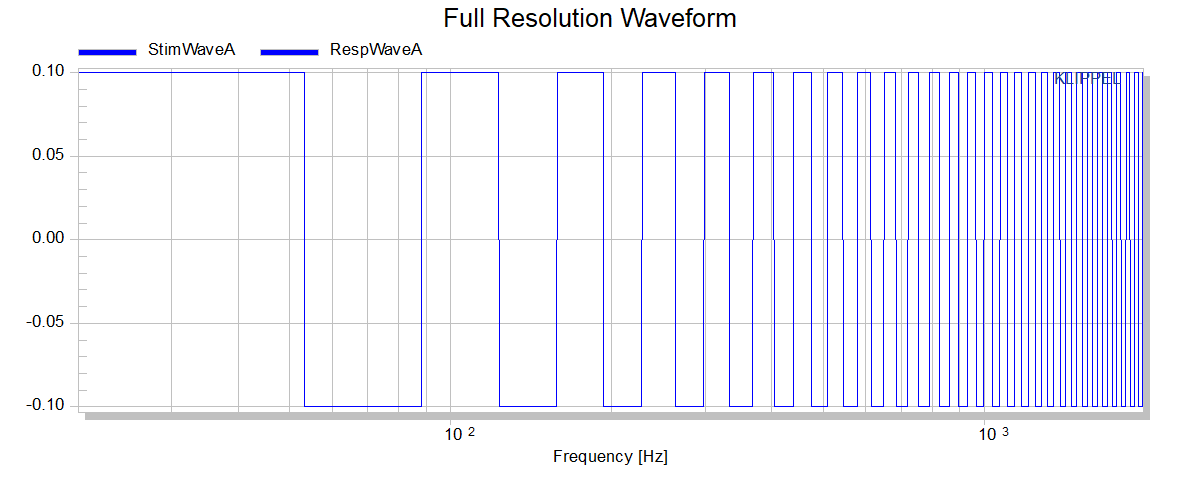
Naturally, this stimulus contains a high level of harmonic distortion and thus also high Rub&Buzz symptoms. Evaluating distortion measures is not recommended but possible.
At higher frequencies (above 5 kHz) only a few points define the square wave test signal. Thus, it is advisable using a higher sampling rate (96 or 192 kHz) to ensure a rectangular test signal up to 20 kHz. The actual waveform may easily be checked by an oscilloscope.
The amplitude of the rectangular test signal is defined by the RMS test level (in the example above 0.1 V).
The feature can be installed / deinstalled using the Feature Library Selector. See section Enabling & Disabling Features.
Properties#
Default properties are automatically added to the customized parameter at Login if this feature library is installed and if the customization is enabled.
There are no dedicated parameters available for square wave test stimulus.
Square_Enable#
Description#
This bool parameter enables the feature. It is disabled by default.
Available in Property#
Parameters (can be modified without effect on Reference DUTs)
Format#
clibParam = 'Square_Enable = %F;';
Working with the Feature#
Using rectangular test signals badly affects distortion measurements. It is not recommended to apply harmonic or Rub&Buzz analysis in this case.
The frequency response by default contains all distortion produced by rectangular wave stimulus. Windowing of the impulse response may be used to isolate the fundamental component and suppress distortion.
Note that in case of PNI – Production Noise Immunity the frequency response is automatically filtered and does not contain distortion. It is therefore not recommended and usually not required to use this feature with PNI.
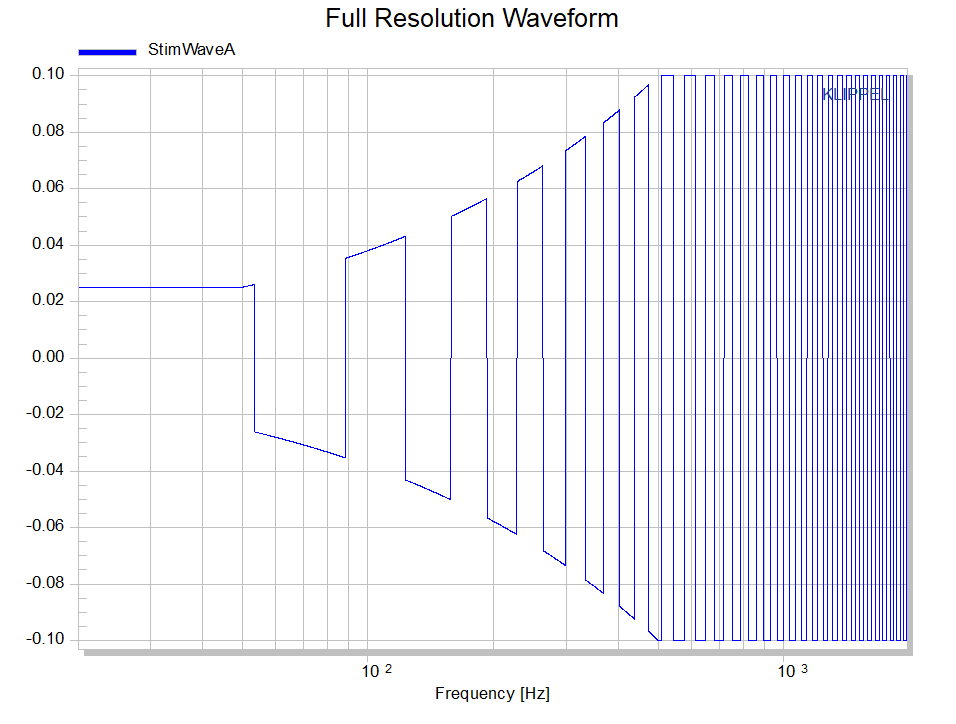
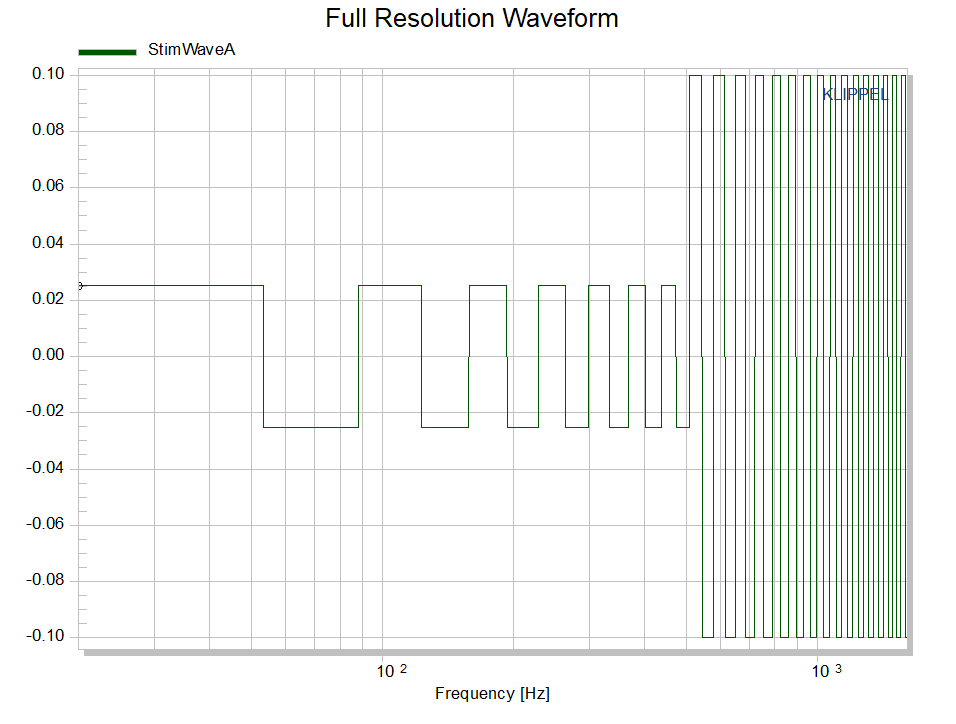
A potential voltage profile is applied to the stimulus. The user is responsible for setting up reasonable profiles to maintain clean rectangular signals. Section wise definition of level is recommended.
- Bad
levelProf - [
50 -12
500 0];
- Good
levelProf - [
50 -12
509 -12
509.01 0];
The feature can simply be switched on or off, no other parameter is required.
Stepped Sine Sweep Test Stimulus#
Applicable to#
Available from QC 6.6
Requirements#
License required (free of charge)
Dedicated for comparison and evaluation, production line application not recommended
Feature Description#
This feature library replaces the continuous logarithmic sweep signal (chirp) of the SPL task with a discrete, stepped sine signal with continuous frequency steps (full periods).
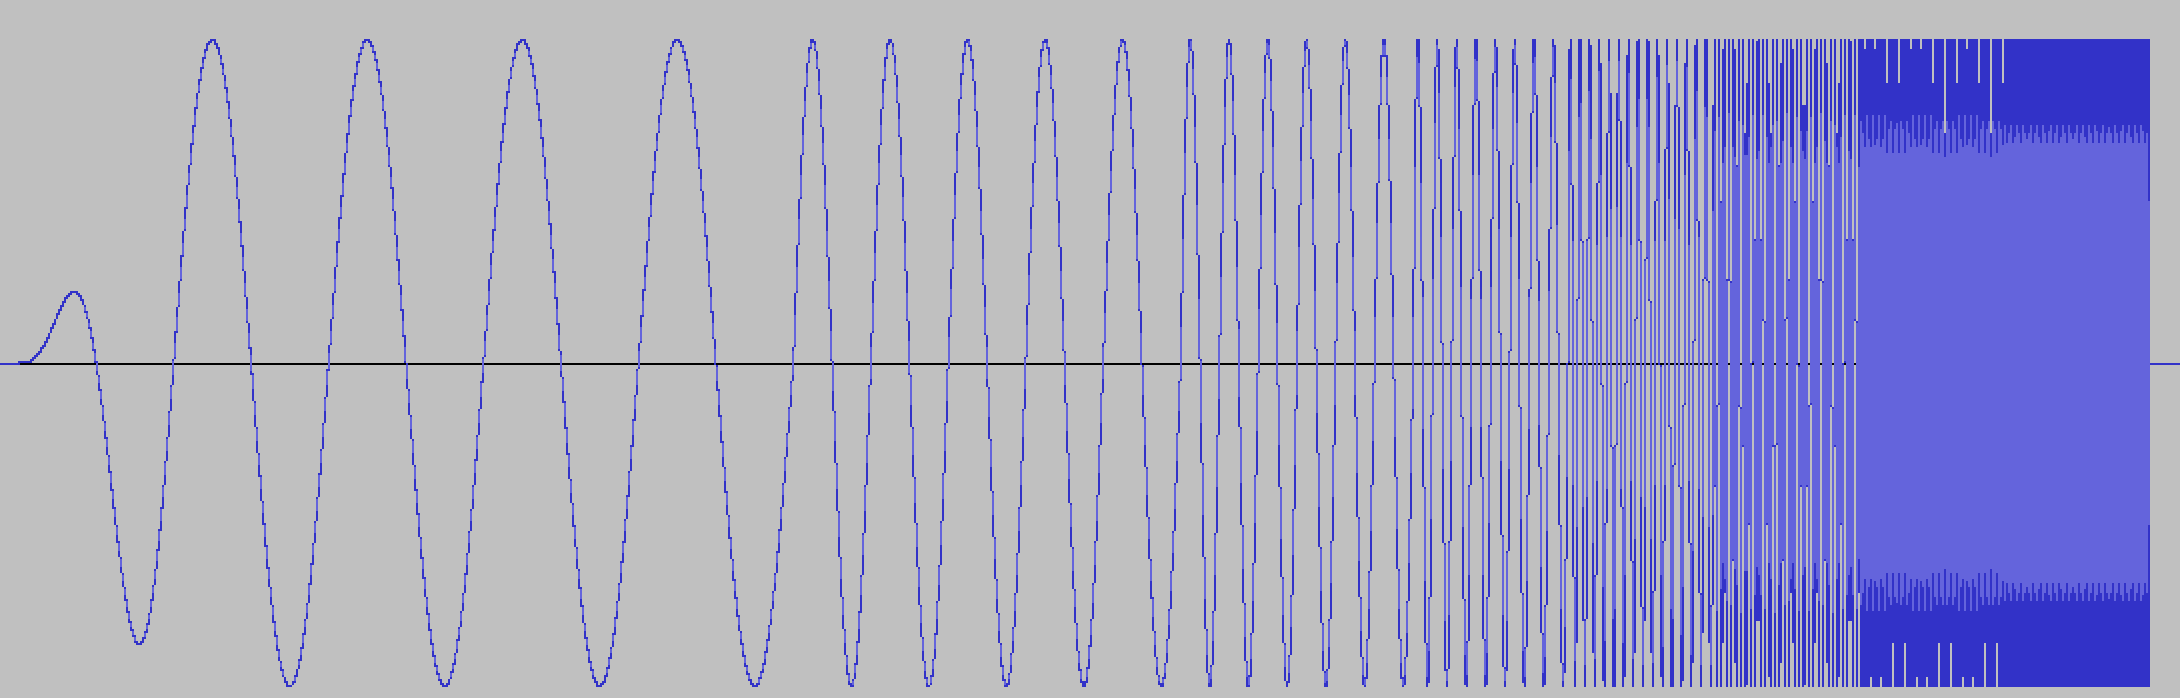
This test signal is inferior to the continuous chirp signal because of clear performance limitations:
limited frequency resolution (non-continuous DUT excitation)
Significantly longer test time (multiples of chirp duration)
This feature was implemented for the purpose of comparison with other test systems that use stepped sine signals. In most cases, there is no systematic deviation of the test results related to the different test signals.
The feature can be installed / deinstalled using the Feature Library Selector. See section Enabling & Disabling Features.
Limitations#
The following features of the SPL task and add-on are not supported while this feature is active:
3DL add-on
MHT add-on
Manual Sweep
Rub&Buzz – Peak and RMS mode (only HOHD)
ALD add-on
Impulse response windowing
Delay measurement/compensation
Speed Profile
Furthermore, the overall performance of the signal processing is inferior to normal log chirp signal, especially for long stepped sine signals.
Properties#
Default properties are automatically added to the customized parameter at Login if this feature library is installed and if the Customization is enabled in the host task.
stepSineEnable#
Description#
This bool parameter enables the feature. It is disabled by default.
Available in Property#
Parameters (can be modified without effect on Reference DUTs)
Format#
clibParam = ' stepSineEnable = %T;';
stepSineMinCycles#
Description#
This parameter defines the minimal number of periods per frequency step. This affects mainly low frequencies and has significant impact on total test time.
Default values:#
stepSineMinCycles = 5;
Available in Property#
Parameters (can be modified without effect on Reference DUTs)
Format#
clibParam = 'stepSineMinCycles = 5';
stepSineMinTime#
Description#
This parameter defines the minimal time spent for each frequency step in seconds. This mainly defines the step duration at high frequencies where cycle time is short (overrides stepSineMinCycles).
Default values:#
stepSineMinTime = 0.05;
Available in Property#
Parameters (can be modified without effect on Reference DUTs)
Format#
clibParam = ‘stepSineMinTime = 0.03';
Related SPL Task Properties#
In addition to the feature specific custom parameters, the step sine signal is also affected by stimulus properties of the SPL task:
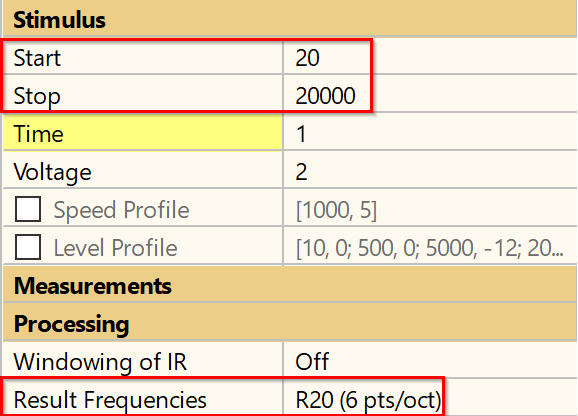
Start/Stop Frequency#
These parameters define the frequency range of the stepped sine signal.
Result frequencies/Resolution#
These parameters define the effective frequency resolution of the stepped sine signal and therefore also the result curves. A high resolution significantly increases overall test time.
Level Profile#
Level profile allows shaping the amplitude if the stepped sine signal over frequency.
Working with the Feature#
As soon as the feature has been activated and enabled (stepSineEnable), the normal log sweep will be
replaced with the stepped sine signal. The Sound Pressure Task can be used as usual, though you may
notice longer delays after changing settings or starting a test. Incompatible settings and features
will be blocked and indicated by warnings and errors.
Rub&Buzz - HOHD#
Note that RMS – HOHD (high-order harmonic distortion) is currently the only supported Rub&Buzz processing type (Rbz – Type) taking only harmonic distortion components into account. The min and max harmonic order for the HOHD calculation can be adjusted via RBz – Filter. Find more information in QC Manual.

Test Time#
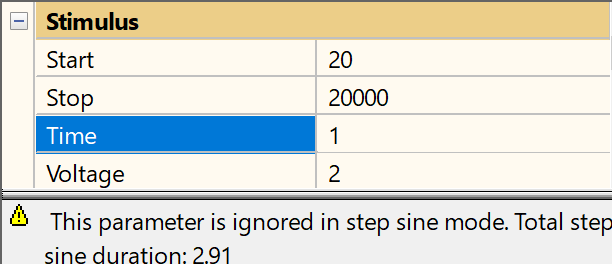
Since the overall test signal duration is implicitly define by the bandwidth, resolution, number of periods and minimal duration per step, the resulting time is displayed in the parameter comment of Time.
Handling Delays#
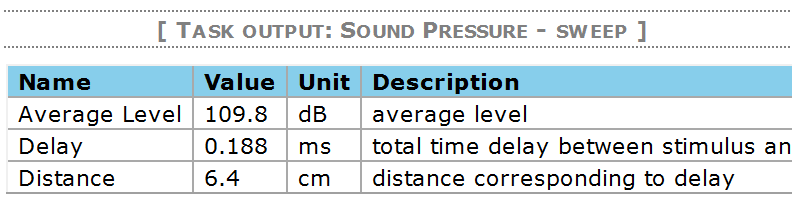
Currently, neither impulse response windowing nor delay detection is available when this feature is activated. For most acoustical test scenarios with a near field microphone and passive or active DUTs without DSP, this can be neglected. However, significant digital delays can degrade the result since the mapping of response and excitation steps is falsified.
You may use Recording Delay parameter to compensate for static, known delays. Check the delay using normal chirp signal with stepped sine feature deactivated.
Alternatively, the SYN – External Synchronization add-on detects and removes delays automatically with high accuracy using a dedicated synchronization trigger signal. This is recommended especially for varying delays in digital audio systems.

Use SYN: Closed Loop mode that can be activated in Control:Start - Execution and select Synchronization mode in SPL Task according to your DUT’s effective bandwidth.
Sequence Control#
Applicable to#
All measurement tasks
Requirements#
Not licensed, free of charge
Feature Description#
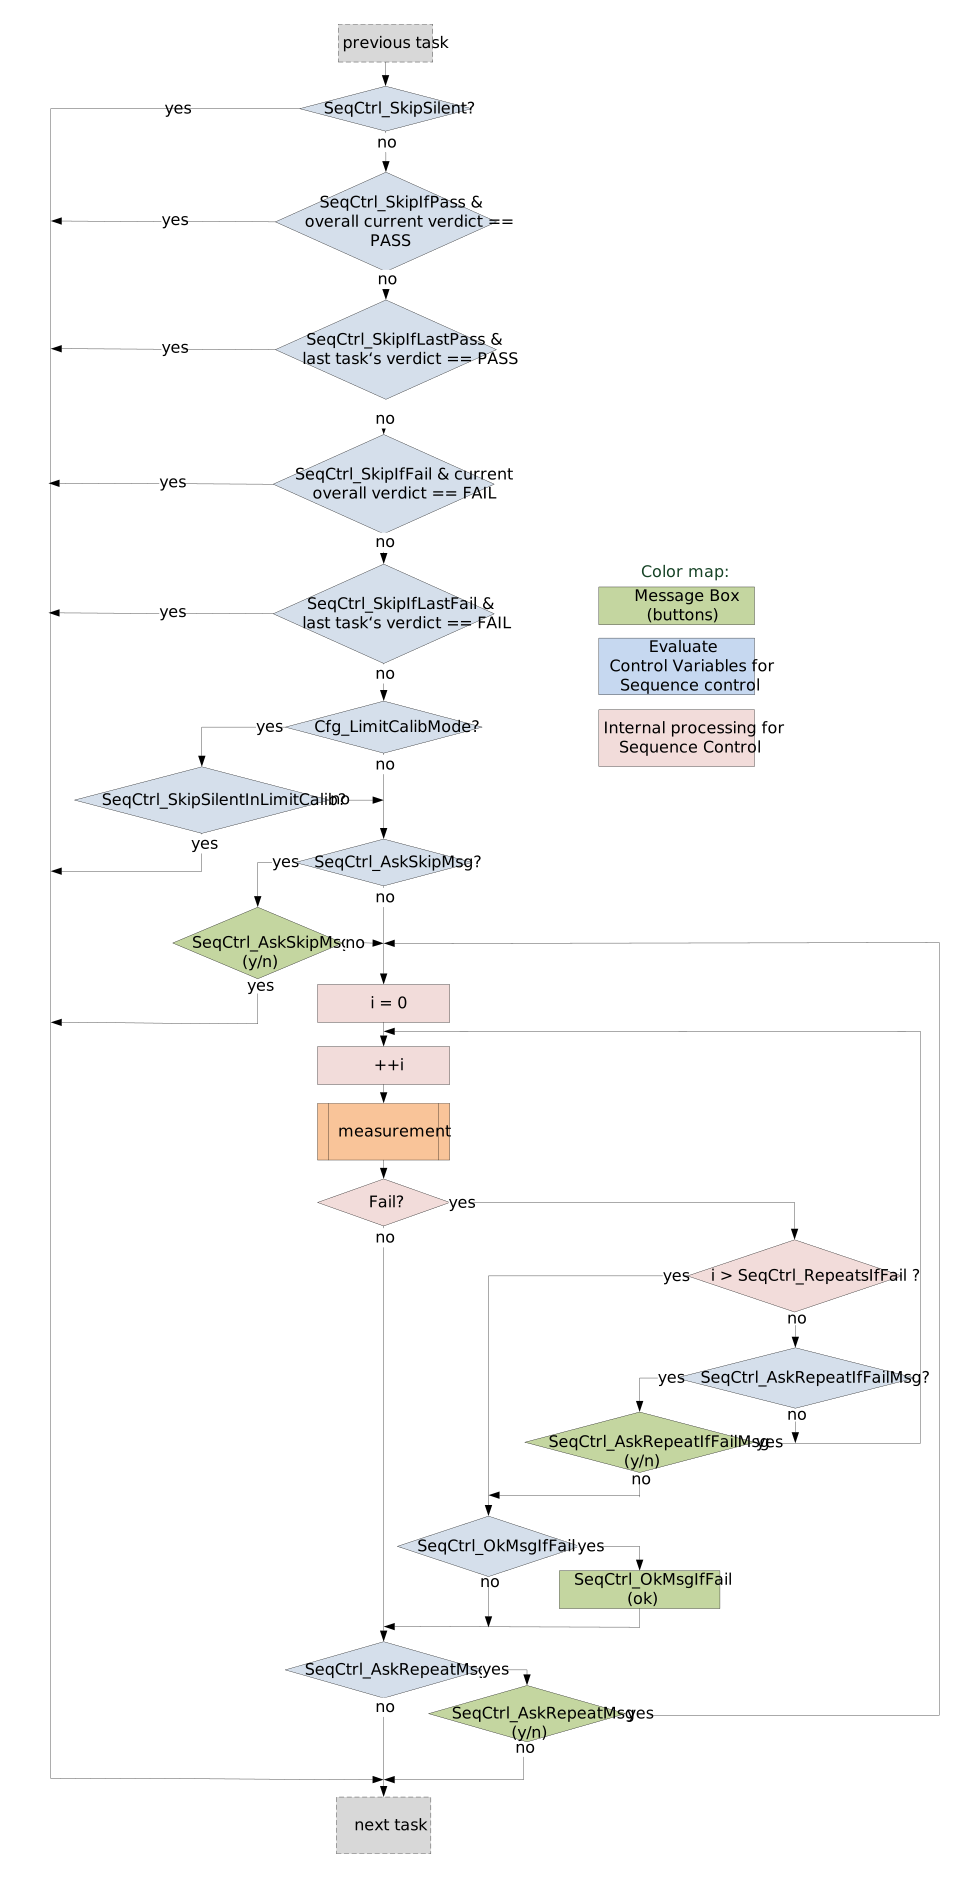
This feature provides a basic sequence control for skipping or repeating measurement steps in a task sequence. The mechanism for skip or repeat a task may be interactive (message box) or automatic.
All sequence control definitions are inactive in Limit Calculation Mode.
In case of a repetition, previous verdicts are overwritten. If a measurement task is skipped, its verdicts are set to void.
Repetitions performed by the task itself (e.g., PNI add-on, EQA, SPL-IMP) are regarded as the measurement of the task. Sequence control is inactive until all repetitions are completed.
Properties#
If this feature is active, all available parameters are initialized to the standard values (feature inactive) on Login.
SeqCtrl_SkipSilent#
Description#
This Boolean parameter (default: %F) provides the possibility to always deactivate a measurement
task. If true (%T) the task’s measurement and analysis are skipped without user interaction.
If a task is skipped, its results are set to VOID.
Note
This parameter overrides all other sequence control definitions.
Format#
libParam =[' SeqCtrl_SkipSilent = %T; '];
or
clibParam =[' SeqCtrl_SkipSilent = %F; '];
SeqCtrl_AskSkipMsg#
Description#
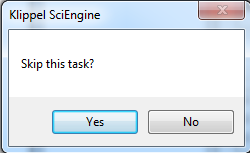
This string parameter defines a message that is shown in a yes/no message box before the measurement. If the message box answered with yes, the task is skipped. If answered no, the task is not skipped.
If the message is not defined (empty string or spaces only), no message box is raised. Spaces at begin and end of the message are stripped.
- Example
clibParam =[ ' SeqCtrl_AskSkipMsg = ''Skip this task?’’; '];
SeqCtrl_AskRepeatMsg#
Description#
This string parameter defines a message that is shown in a yes/no message box after the measurement of the current task. If the message box is answered with yes, the task’s measurement is repeated.
If the message is not defined (empty string or spaces only), no message box is raised. Spaces at begin and end of the message are stripped.
- Example
clibParam = [' SeqCtrl_AskRepeatMsg = ''Repeat this task?’’; '];
SeqCtrl_RepeatsIfFail#
This integer parameter defines allowed repetitions of a task if the task’s overall verdict is fail
If
SeqCtrl_RepeatsIfFail = 0(default) - no repetitions allowedIf
SeqCtrl_RepeatsIfFail = N, (0 < N ≤ 100) the failed test can be repeated for maximal N times.
This parameter works in conjunction with SeqCtrl_AskRepeatIfFailMsg. If this message is defined, a
yes/no message box is raised before every repetition, if the message is not defined (empty or spaces
only) the repetition is executed automatically in case of a fail verdict of the task.
Please note that the repetition counter is reset in case a measurement is repeated with SeqCtrl_AskRepeatMsg.
- Example
clibParam = [' SeqCtrl_RepeatsIfFail = 3; '];
SeqCtrl_AskRepeatIfFailMsg#
Description#
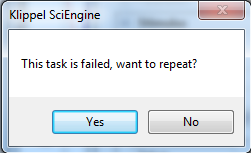
This string parameter defines a message that is shown in a yes/no message box when a repetition is
triggered due to a FAIL verdict of the task. The parameter SeqCtrl_RepeatsIfFail defines the
allowed number of repetitions.
If answered with yes, the task is repeated.
If the message is not defined (empty string or spaces only), no message box is raised. Spaces at begin and end of the message are stripped.
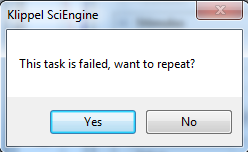
- Example
clibParam =[ ' SeqCtrl_AskRepeatIfFailMsg = ''This task is failed, want to repeat?’’; '];
SeqCtrl_OkMsgIfFail#
Description#
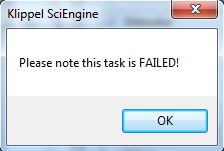
This string parameter defines a message that is shown in a ok message box if the task’s verdict is
fail, but the task is not repeated (parameter SeqCtrl_RepeatsIfFail).
If the message is not defined (empty string or spaces only), no message box is raised. Spaces at begin and end of the message are stripped.
- Example
clibParam =[' SeqCtrl_OkMsgIfFail = ''Please note this task is FAILED!’’; '];
SeqCtrl_SkipSilentInLimitCalib#
Description#
This Boolean parameter (default: %F) allows deactivating the limit calibration feature of a selected
measurement task. If the limit calibration of a task is skipped, the corresponding limits are kept
unchanged while the remaining task’s limits are adjusted.
Format#
clibParam =[' SeqCtrl_SkipSilentInLimitCalib = %T; '];
or
clibParam =[' SeqCtrl_SkipSilentInLimitCalib = %F; '];
SeqCtrl_SkipIfPass#
This Boolean parameter (default: %F) provides the possibility to skip a task if the (current)
overall verdict is PASS. If true (%T) the task’s measurement and analysis are skipped without user
interaction if the current overall verdict is PASS (or WARNING).
If a task is skipped, its results are set to VOID.
Format#
clibParam =[' SeqCtrl_SkipIfPass = %T; '];
or
clibParam =[' SeqCtrl_SkipIfPass = %F; '];
SeqCtrl_SkipIfFail#
This Boolean parameter (default: %F) provides the possibility to skip a task if the (current)
overall verdict is FAIL. If true (%T) the task’s measurement and analysis are skipped without user
interaction if the current overall verdict is FAIL.
If a task is skipped, its results are set to VOID.
Format#
clibParam =[' SeqCtrl_SkipIfFail = %T; '];
or
clibParam =[' SeqCtrl_SkipIfFail = %F; '];
SeqCtrl_SkipIfLastPass#
This Boolean parameter (default: %F) provides the possibility to skip a task if the verdict of the
previous task is PASS. If true (%T) the task’s measurement and analysis are skipped without user
interaction if the previous task verdict is PASS (or WARNING).
If a task is skipped, its results are set to VOID.
Format#
clibParam =[' SeqCtrl_SkipIfLastPass = %T; '];
or
clibParam =[' SeqCtrl_SkipIfLastPass = %F; '];
SeqCtrl_SkipIfLastFail#
This Boolean parameter (default: %F) provides the possibility to skip a task if the verdict of the
previous task is FAIL. If true (%T) the task’s measurement and analysis are skipped without user
interaction if the previous task verdict is FAIL.
If a task is skipped, its results are set to VOID.
Format#
clibParam =[' SeqCtrl_SkipIfLastFail = %T; '];
or
clibParam =[' SeqCtrl_SkipIfLastFail = %F; '];
Working with the Feature#
The feature Sequence Control is an add-on for QC software version 5 or higher.
Install the feature using the Feature Library Selector. See section Enabling & Disabling Features.
Enable the feature on Customization property on property page Tasks:
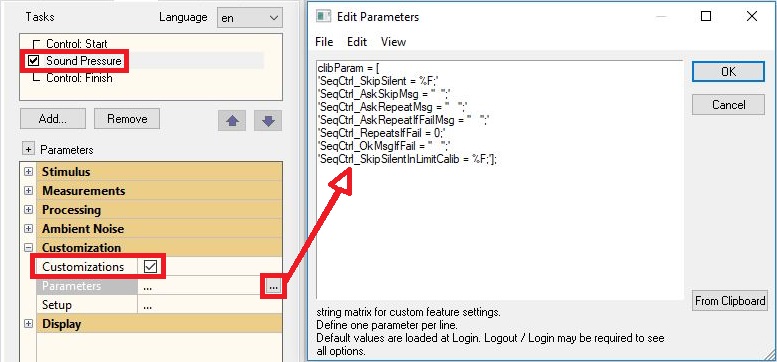
Note
Note: After enabling the Customizations checkbox the parameters may be empty. It is recommended to logout / login to load the default values and force the initialization.
Define the parameters as needed.
IO (input / Output)#
Available from QC 6.7
Applicable to#
Any measurement task. Pure non-measuring tasks (e.g., PP Task, IO Task) may not work in all aspects. See details in the following section.
Requirements#
Not licensed, free of charge
Feature Description#
The IO feature library provides useful tools in addition to the functionality of the QC measurement tasks. The reason why such features are not implemented in the measurement tasks itself is the trade-off between complexity of such tasks and the rare need of those features.
IO features that are added by this feature library are:
Switching the digital output pins (available for PA, KA3 hardware and IO-Monitor API and Automation API) after the actual measurement. The pin settings in the tasks itself and also in the control task in section Routing are used to switch those pins before the measurement.
Showing a message box with user-definable text after a measurement. May be used to inform or to instruct the operator or engineer during the test sequence.
Properties#
IOFlib_Enable#
Description#
This bool parameter enables the feature. It is disabled by default.
Note
It does not activate any feature if set to true. It just makes it possible to use mentioned features described below.
Available in Property#
Parameter (can be modified without effect on Reference DUTs.)
Format#
clibSetup = ' IOFlib_Enable = %F;';
IOFlib_SetGpioVal#
Description#
This vector parameter specifies the state of the GPIO outputs to be set:
a value
= 1sets the output activea value
= 0resets the output
No other values are allowed.
An output is only set to the defined state, if the IOFlib_SetGpioMask parameter is set to 1 for
the same output (column of vector).
Note
The separation of the output setup into value and mask was done due to usability of entering it in a plain text editor.
Available in Property#
Parameter (can be modified without effect on Reference DUTs.)
Format#
clibSetup = ' IOFlib_SetGpioVal = [0, 0, 0, 0, 0, 0, 0, 0, 0]; ';
IOFlib_SetGpioMask#
Description#
This vector parameter specifies the mask of the output pins to be set:
A mask
= 1allows the output to be set or reset. The value itself is defined inIOFlib_SetGpioVal.A mask
= 0ignores any setting defined inIOFlib_SetGpioVal.
No other mask values are allowed.
An output is only set to the defined state, if the IOFlib_SetGpioMask parameter is set to 1 for
this particular channel (column of vector).
Note
The separation of the output setup into value and mask was done due to useability of entering it in a plain text editor.
Available in Property#
Parameter (can be modified without effect on Reference DUTs.)
Format#
clibSetup = ' IOFlib_SetGpioMask = [0, 0, 0, 0, 0, 0, 0, 0, 0];';
IOFlib_MsgBoxAfter#
Description#
This string defines a text to be displayed after measurement or limit check (in case of limits exist) in a message box. If this string is empty, no message is shown.
Note
Note the mandatory two single quotes at the begin and end of string. A valid text must be
specified as ''{string}''. The reason is a underlying text parser that needs to escape quotes to be set correctly.
Example#
IOFlib_MsgBoxAfter = ''My text for the operator.''
Available in Property#
Parameter (can be modified without effect on Reference DUTs.)
Format#
clibSetup = ' IOFlib_MsgBoxAfter = '''' ';
Working with the Feature#
This feature is an add-on for QC software version 6.2 or higher.
Install the feature using the Feature Library Selector. See section Enabling & Disabling Features.
Enable the feature on Customization property on task property page:
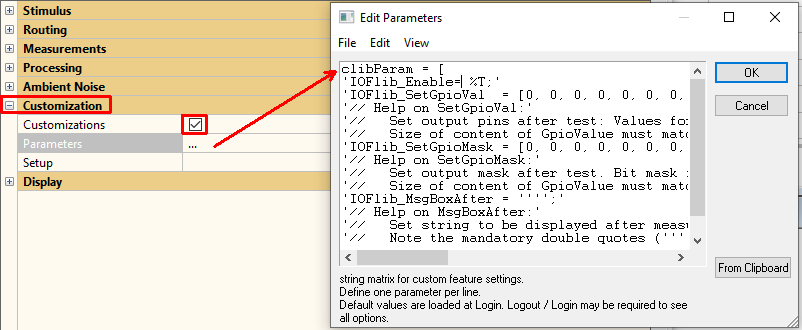
After enabling the *Customizations* checkbox the parameters may be empty. It is
recommended to logout / login to load the default values and force the initialization.
Enable the feature by editing the line manually:
clibParam = 'IOFlib_Enable = **%T**;'
Define the output pin configuration as required for your application or define a text message.
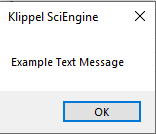
A text message ”Example Text Message” would appear like this:
Application Example: Output Scheme Modification#
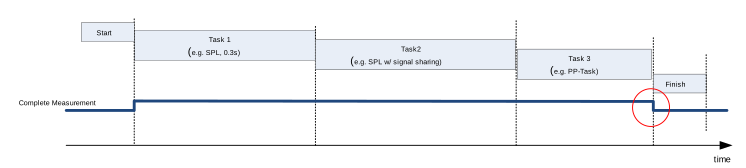
One typical example for this feature is the option, to signalize the end of a measurement to an automated environment. The standard feature (see QC Manual section Fixed Schemes) will set an output (by default output channel 3 = output pin 5) to active during the measurement in a test sequence.
Due to dynamic decisions whether a task will actually measure or not (e.g., signal sharing, post processing tasks, waiting for input pins or user interaction) this default output scheme logic needs to be quite conservative and wait until any possible measurement finished. This is usually the last task. If the last task(s) do not measure, this pin may be switched off too late, wasting valuable time for other actions such as moving the DUT.
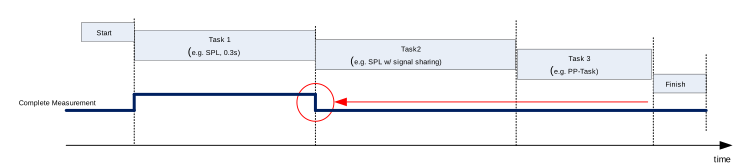
Using this feature library after any task the output pin used for this scheme can be forced to reset.
Default Operation:
Modified Operation:
Adjust Limits of Frequency Response#
Available from QC 7.2 (dB-Lab 212.226)
Applicable to#
Requirements#
Not licensed, free of charge
Feature Description#
There can be systematic variations in a batch of manufactured drive units in the fundamental frequency response during end-of-line testing that might lead to limit violation and consequently a systematic FAIL verdict.
These systematic variations may be accepted in some cases. The operator shall have the freedom to derive an additional set of limits for the fundamental frequency response based on the response of a batch reference sample Batch Golden DUT (BGD).
The adjusted upper and lower batch limit shall be derived from and created in addition to the standard PASS / FAIL limit set (as calculated in Limit Calculation Mode) and only differ from it where the BGD exceeds the upper limit or falls below the lower limit (with an adjustable tolerance). This batch limit is implemented as a grading limit and stored in Grade1 limit. Therefore, grading must not be used in Limit Calculation Mode for the fundamental frequency response.
Both limit sets apply resulting in the following three verdict cases:
PASS: if the response lies within both limit sets
WARNING: if the response violates the standard limits but does not exceed the batch limits
FAIL: if the response violates all limits
The Operator has the opportunity to trigger batch limit adjustment any time via the QC Control Panel (button) and define jitter and shift value (single values) for limit adjustment. Default values will be presented that can be specified by the Engineer. Multiple exceeded bands are handled. The operator has to process each violation of the limit separately (multiple message boxes).
Properties#
This feature requires an activated Frequency Response measure in the SPL task.
adjLim_Enable#
Description#
This Bool parameter enables the feature. It is disabled by default.
Note
It does also activate this feature for any Sound Pressure (SPL) task in the sequence.
Applicable to#
Control Task
Available in Property#
Parameter (can be modified without effect on Reference DUTs.)
Format#
clibSetup = ' adjLim_Enable = %F;';
adjLim_Password#
Description#
This string parameter specifies an optional password. Any plain ASCII string is supported. If specified, it is checked each time when the limit adjustment is triggered. The password can be set and edited by engineer. The password must be entered for both, engineers and operators.
Applicable to#
Control Task
Available in Property#
Parameter (can be modified without effect on Reference DUTs.)
Format#
clibSetup = ' adjLim_Password = ''myPassword4254''; ';
adjLim_DfltShift#
Description#
This numerical parameter specifies the vertical shift for batch limit (Grade 1) calculation. It is applied together with the jitter parameter in the frequency range of limit violation. Frequency-dependent shifts are not supported.
For each section were a limit violation was detected, a separate shift value will be queried. For lower limit violation the shift will be applied into negative direction. Do not enter negative shift values.
- Unit
dB
Applicable to#
Available in Property#
Parameter (can be modified without effect on Reference DUTs.)
Format#
clibSetup = ' adjLim_DfltShift = 2;';
adjLim_DfltJitter#
Description#
This numerical parameter specifies the jitter factor for batch limit (grade 1) calculation. It is applied together with the shift parameter in the frequency range of limit violation. Frequency-dependent jitter values are not supported.
Note
Frequency ranges of limit violation are extended by the width of jitter. Please see section Working with the Feature.
For each section where a limit violation was detected, a separate jitter value will be queried.
- Unit
%
Applicable to#
Available in Property#
Parameter (can be modified without effect on Reference DUTs.)
Format#
clibSetup = ' adjLim_DfltJitter = 15;';
Working with the Feature#
This feature is an add-on for QC software version 7.2 or higher.
Make sure, you are logged out. Install the feature using the Feature Library Selector. See section Enabling & Disabling Features.
Log into test, select , enable Customizations and edit Customization / Parameters:
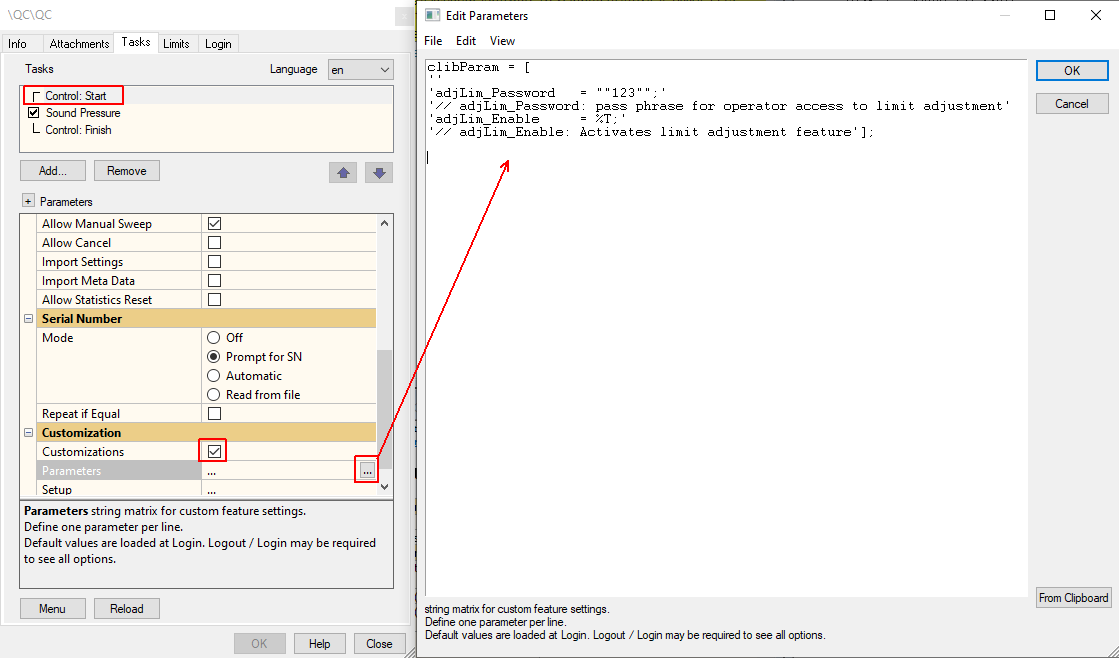
Note
To load default parameters, it may be required to logout / login again after enabling the global Customization option in the Control and Sound Pressure (SPL) tasks.
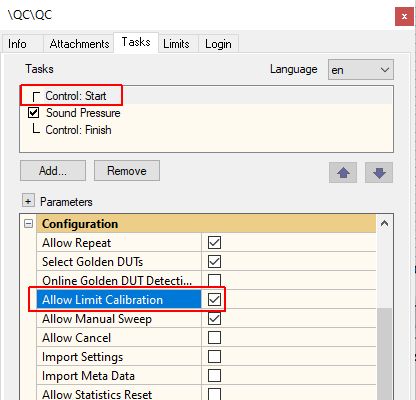
Set
adjLim = %Tto activate the feature in Control task. You may optionally specify a password.Allow Limit Calibration option in Control Task:
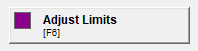
In control panel a new button should appear: Adjust Limits. It replaces the Limit Calibration function:
Select (any) Sound Pressure Task / Customizations and activate those:
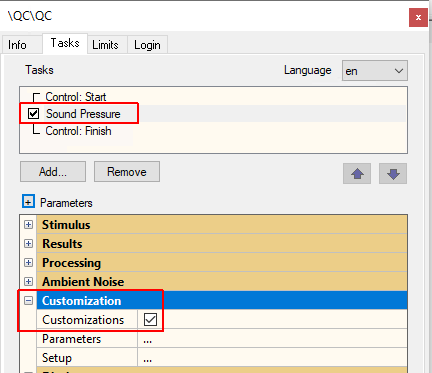
Note
To load default parameters, it may be required to logout / login again after enabling the global Customization option in the Control and Sound Pressure (SPL) tasks.
Default parameters for jitter and shift operation may be adjusted by editing Parameters here.

Enable display of grades in section Display for any Sound Pressure task.
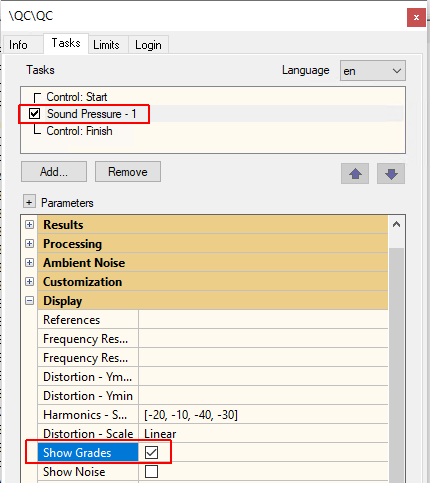
Start testing. When a test fails, the button Adjust Limits can be pressed to start the limit adjustment process.
If a password was defined in the control task settings, it is queried first:
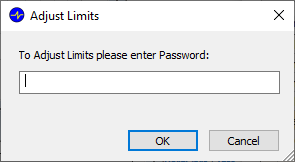
Enter the password and confirm with OK.
No measurement is performed. The last available measured data of Frequency Response is used. If no measurement was done before, an error message is shown. It is required to run a measurement before adjusting limits.
If the last measurement of Frequency Response was within limits (PASS), nothing is done. In case of a failed verdict, the user is queried how to adjust limits:
If an adjusted limit exists already, the user must decide to create a newly adjusted limit or to use the existing limit and widen it iteratively. This allows the operator also to reset older adjustments.
For each violation of the limit causing a failed verdict in the latest measurement, the operator is queried to enter a shift and a jitter value to widen (adjust) the limit headroom.
This process is done for upper and lower limit separately starting with the upper limit Max.
Each input shall be confirmed with OK to proceed with the adjustment. If on any of the dialogs Cancel is selected, the adjustment process is terminated and the limit is not adjusted. Note, that the selection of keeping older adjustments is considered anyway.
If any other test verdict of the Sound Pressure task fails, the overall verdict is FAIL. If Frequency Response is the only failed verdict, a warning is indicated in summary chart:
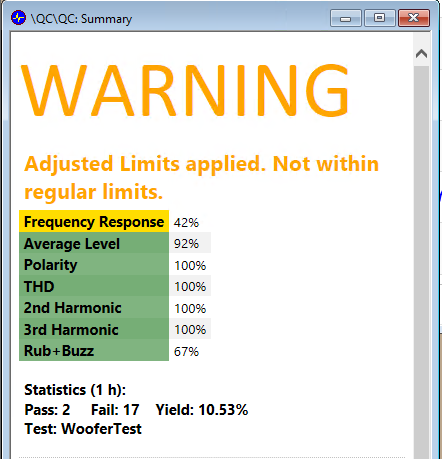
Already adjusted limits may be reset by pressing Adjust Limits button after a PASS or Warning Verdict of a test. The user is queried to reset existing adjusted limits:
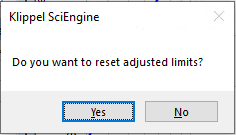
The adjusted limit is stored in the database and available also after Logout / login process. It is also kept when using Master Tests using QC-Start. A Warning verdict counts as a passed test result in the statistics.
If settings log function is enabled for traceability reasons,
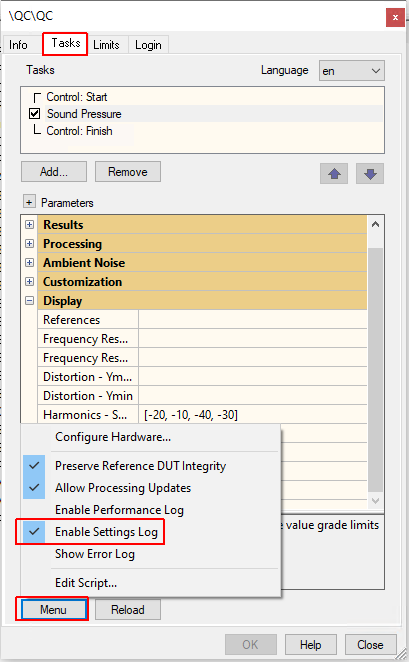
each process of limit adjustment is stored in separate database files and log files. Settings log files can be found in a sub folder of the test folder containing the test database:
{test folder}/localData/ModifyLimits: contains database before and after limit adjustment{test folder}/localData/SettingsLog: contains text (*.modlim) file with meta data of adjustment process.This ensures a reliable and gap-less traceability of limits settings applied in production tests.
