
KET – Calibration#
Using the KET Calibration process the accuracy of results can be increased considerably. Supported amplifiers are uncalibrated when purchased.
Specifications#
- Specified voltage at amplifier output with a 10R load
Accuracy: ±1 %
Frequency: 600 Hz
- Monitored voltage at amplifier output with a 10R load via API
Accuracy: ±1 %
Frequency: 600 Hz
- Monitored current at amplifier output with a 10R serial load via API
Accuracy: ±1 %
Frequency: 600 Hz
The accuracy is valid for a fully adjusted KET amplifier in digital and analog domain only. It is valid for a sine signal at the specified frequency at an ambient temperature of 18 - 28 °C. The frequency dependent deviation and the accuracy of unadjusted KET amplifiers are defined in the specification sheet S16 Klippel Endurance Test (KET).
Calibration Procedure#
This chapter describes how to do the calibration and adjustment of the sensors within the Powersoft devices Mezzo and Unica, that are used for the Klippel Endurance Test (KET). For a full tutorial on how to use the KET-Software, please visit the KET Manual.
Note
If you are using the KET for the first time, please read through the Safety Instructions carefully.
Calibration Interval#
Amplifier used for KET should be calibrated on a regular interval. Klippel recommends a 1-year or 2-year interval.
Time Required for Calibration#
Manual calibrations will take approximately 10-20 minutes per amplifier, depending on channel count of the KET amplifier.
Recommended Test Equipment#
The test equipment recommended for the calibration and adjustment procedures is listed below. If the exact instrument is not available, use the accuracy requirements shown to select substitute calibration standards.
- AC Voltage
Recommendend equipment: Keysight 34461A
Accuracy requirements: 0.5 % at 600 Hz
- AC Current
Recommendend equipment: Keysight 34461A
Accuracy requirements: 0.5 % at 600 Hz
Test Considerations#
Ensure that all terminal connections (both input and output terminals) are removed before starting any calibration or adjustment procedure.
For optimal performance, all test procedures should comply with the following recommendations: - Assure that the calibration ambient temperature is stable and between 18 °C and 28 °C. - Assure ambient relative humidity is less than 80 %. - Allow a 1-hour warm-up period before calibration or adjustment. - Keep cables as short as possible.
Test Setup#
Required Software#
Dante License
Klippel KET-Seq License
Klippel KET Calibration software
Required Hardware#
Calibration object (Powersoft Mezzo or Unica)
USB to Ethernet adapter (optional)
Digital Multimeter with 10 VAC range & 1 AAC range, see Recommended Test Equipment for details.
Load resistor 10 Ω / ±5 %; power rating at least 13 W
Test leads for wiring
Installation#
For set up the soft- and hardware, please refer to Hardware Setup and KET - Hardware Configuration.
Walkthrough#
Startup#
After the hard- and software is set up and configured, the KET Calibration executable can be started. If you are unsure if the hardware is configured in the right way, you can double check using the button KET Hardware Configuration.
User Interface#
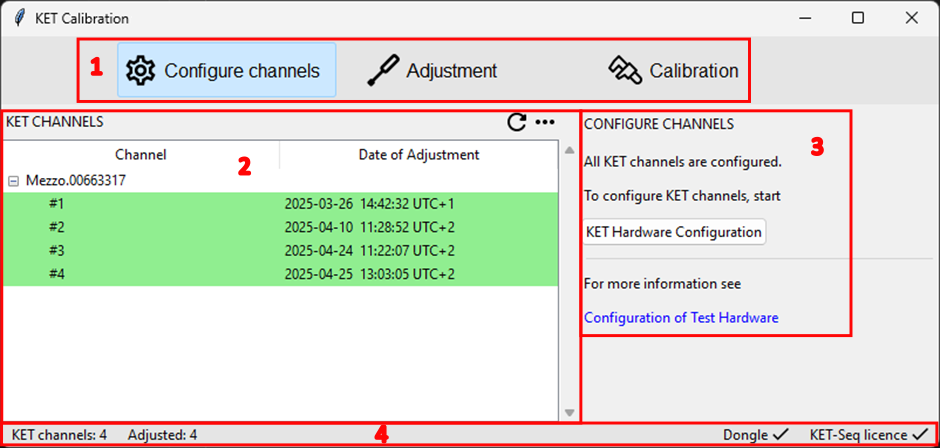
Workflow selection. If some channels are unconfigured or unadjusted a yellow warning sign will be shown.
List of all configured channels been known to the system. Channels of devices that are unconnected will also be shown. To show customized names or unconfigured channels, click the ∙∙∙ button above. A green background indicates an adjusted channel. A red background indicates an unconfigured channel.
Workflow information and actions for the selected channel.
The status bar shows information about channel count, status of Dongle connection and licence.
Channel Configuration#
After the software is installed and one or more KET amplifiers are connected all channels needs to be configured. A warning sign ⚠️ on the Configure channels workflow button indicates unconfigured channels. Select Configure channels and click KET Hardware Configuration. Follow the instructions in KET - Hardware Configuration.
Adjustment#
After all channels have been configured channel adjustment can be started. A warning sign ⚠️ on the Adjustment workflow button indicates unadjusted channels. The adjustment can be carried out either by importing sensor files or by manual adjustment with a multimeter.
See Sensor files for further information on how to use sensor files.
Select Adjustment, select a channel from the list and click Manual adjustment. A dialog window will show up which leads you through the adjustment process. Repeat this process for all channels.
Calibration#
Select Calibration, select a channel from the list and click Calibrate channel. A dialog window will show up which leads you through the calibration process. After channel calibration the dialog window shows the calibration results. To save the results, select the text and press CTRL-C to copy it to the clipboard. Repeat this process for all channels.
Sensor files#
Due to the lack of memory in the amplifiers, calibration data created by KET Calibration are stored in so called sensor files. These files are required to adjust a test system consisting of one or more KET amplifiers and a computer.
A KET amplifier typically has 2 to 8 channels. To connect a device under test (transducer) a KET channel is used. One KET channel represents one amplifier channel and contains three sensors. Correction factors for each individual sensor are stored in a corresponding sensor file.
To be able to use the sensor files on another computer, the files must be copied to the other computer. To make the transfer easier, all sensor files of all channels of a KET amplifier are saved in a zip file.
Export#
Select Adjustment and select a channel from the amplifier from which the sensor files are to be exported. Click Export sensor files and choose a filename. All sensor files from all the channels of the selected amplifier are stored into a zip file.
Import#
To import sensor files from zip file via KET Calibration software, select Adjustment and click Import sensor files. Choose the zip file to be imported.
To manually import sensor files from zip file (without KET Calibration software), unpack all files from the zip file into the following directory.
%ProgramData%/Klippel/RnD/LabBench/Klippel/KET
All sensor files are stored in this directory.
